Where to begin
How to DIY Guide for Magnetic Menu Walls
LetterBank/My DIY Signs has been creating die-cut magnetic letter menus for over 20 years. Here are a few tips to save time and money on this retro-tech project!
 Let's take this step-by-step. I recommend that you read through the article before budgeting for your project, so you have a realistic idea of what the real cost savings will be, before you begin. Allow sufficient time so you're not distracted for best results.
 |
| This actual project shows 3" lowercase heading, 2" lowercase menu items and 1" helvetica capitals for ingredients. |
Determine the size of available menu or menu wall area for your project.
The project for s'wich restaurants required over 2,400 individual letters. LetterBank/My DIY Signs was consulted beforehand and was an integral partner in getting the menu from concept to finish in about two weeks including shipping time.
Decide on how many menu items you will feature on the menu wall at any one time
Unless you already have a plan, it's probably a good idea to use either a different style, color or size to distinguish visibly from the menu items, perhaps a heading and category (Entree, salad, combination, specials, beverage and so on). LetterBank/My DIY Signs has a "Library" charge of $25/hour to go over your menu and break it down into how many of each size letter you will need. All you have to do is choose the color and style.
 |
| Menu strips cost more to set up but may cost less to use |
How large do the letters need to be?
 |
| Hard-to-read menu? |
A good rule of thumb is to determine where the customer will be standing- How far away from the menu wall? A study done by 3M in the 1970s shows that readability is influenced by contrast (white on black is optimal contrast), distance and clarity of type, among other factors. Figure up to 30 feet of readability/visibility for every inch [25mm] of letter height. So a 2" [51mm] letter is, therefore, readable for up to 60 feet [18 meters].
A first-time ordering mistake is getting letters which are too big for a project. If the letters are too big, there's less room for the menu and it actually gives an awkward appearance, much like shouting or amateur hour. Determine how far the customer will have to look to see the menu from where they're expected to read it.
The second largest issueWhat kind of background will you have for your magnets?
Up to this point, we've been discussing the "strips v. individual letters" information. The example shown at top is a company that decided to use a magnetic additive powder to the color paints chosen for their restaurant. This is a fairly inexpensive solution at usually less than $20 or so to add to a gallon of paint in the color of your choice. This works best on flat, smooth walls without much texture. Paints do not have the 'magnetic receptive strength' of let's say a refrigerator.
 You can also order magnetic panels in white or black, framed or unframed, to hang or mount to your walls. Panels are priced based on the size and intended use. You can make your own panels, if you're so inclined, from stainless steel, which can be painted at an auto shop for your specific use. There are so many options available!
 |
| This menu is printed in entire panels. Easy-to-replace rectangular panel can be changed out for breakfast, specials. |
area. Use a good graphic artist to come up with the concept before contacting LetterBank/My DIY Signs for pricing, as the graphics and the complete layout need
Photos are excellent too, as there are an increasing number of semi-literate customers and additionally, photos (professionally done) can sway your customers to try something they may not have known/seen on your menu.
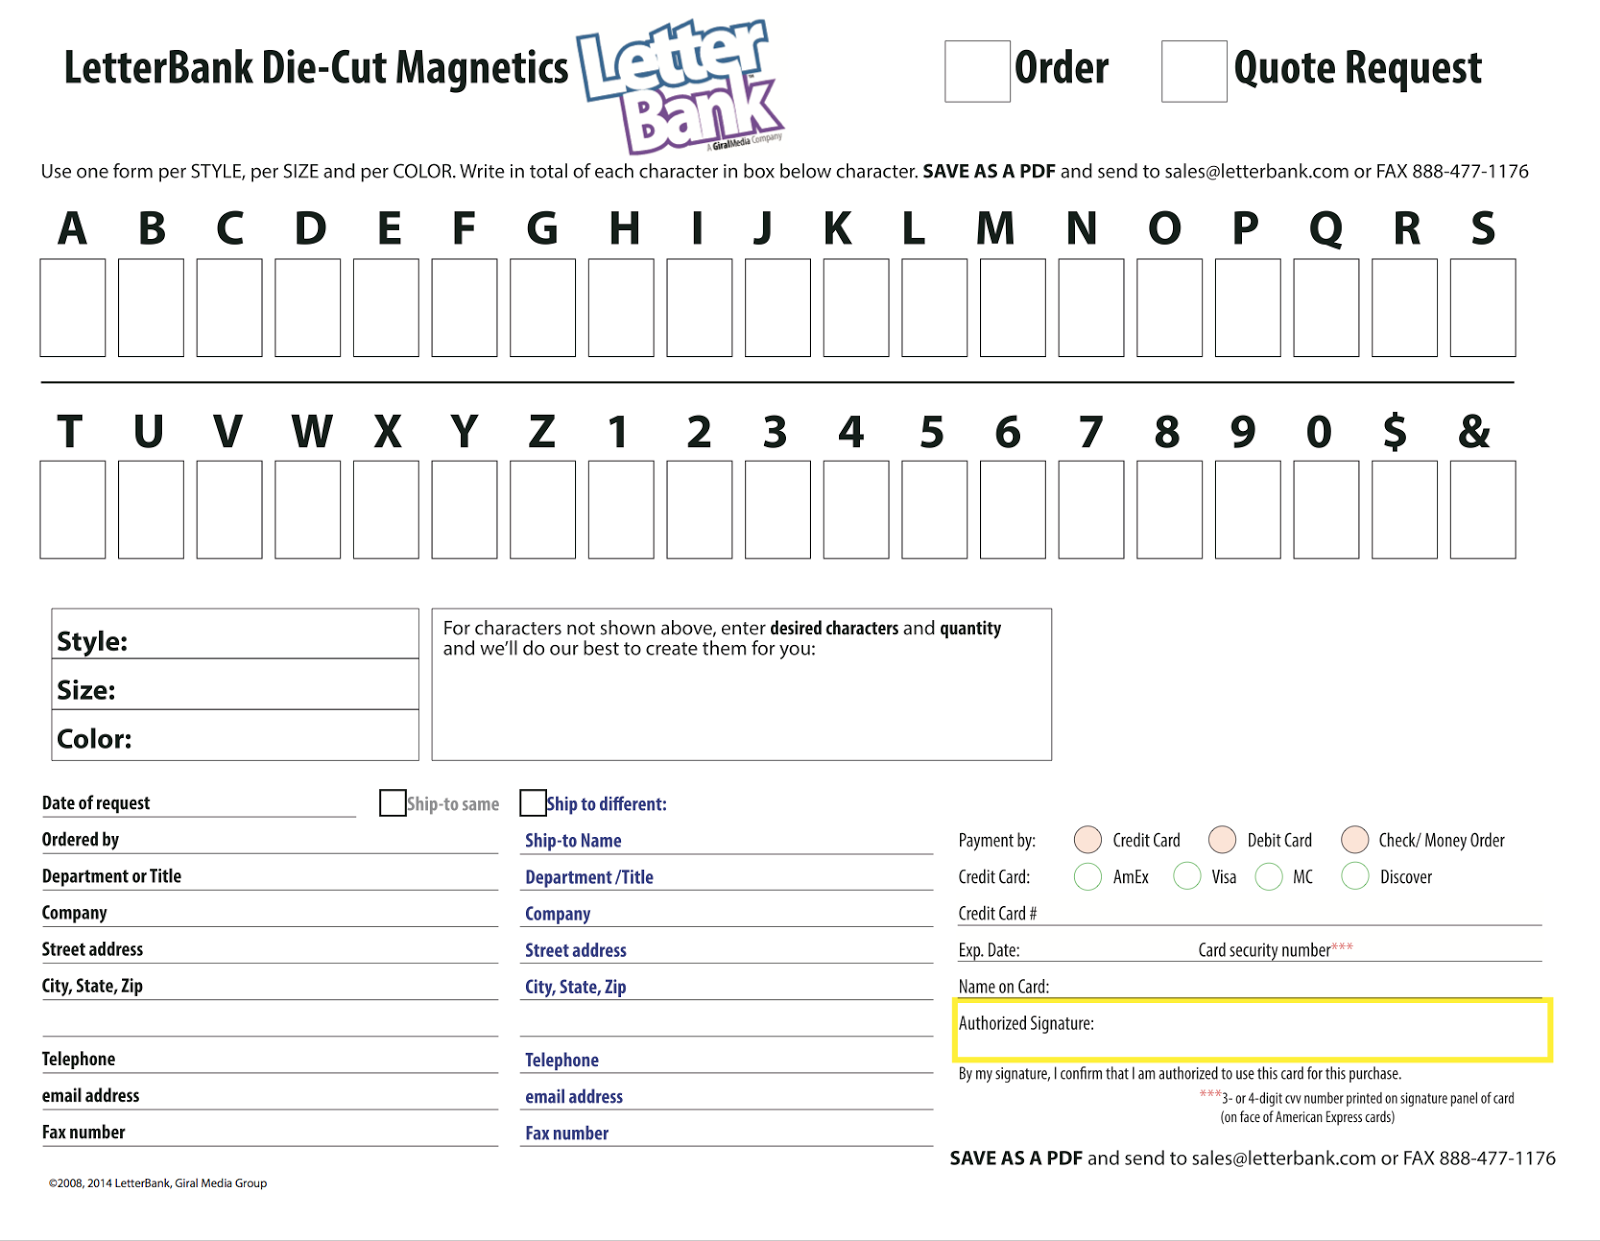
Counting up the menu wordingThere's a form near the bottom of this article, which you can download or copy and print out, to determine how many of each letter you need. Use one printed form per typestyle, per size and per color. So a project with two color lettering would require a minimum of two forms. For strips, send us your layout, vector file and exact dimensions (see what kind of art we need here).
Estimating additional or future menu itemsFor a preliminary estimate or price quote, you can send us your best guess and we'll price it for you, but remember, the more letters you order on the invoice, the greater the earned discount rate, so if you guess 1,000 one-inch letters, but the project is actually 2,000 letters (counting extra or future menu items you may want to have), your price-per-letter cost is much lower at 2,000+ letters.
Requesting a price quoteSend your request for assistance once you have determined the following information:
For individual letters, the total quantity of letters by size, style and color.
For strips, we need your vector art and exact dimensions (see what kind of art we need here).
For panels, we need the exact size of each panel, and the total number of panels.
For ideas or suggestions, tell us what you have in mind.
Consultation and speculative art are both available services; ask for the hourly rates.
Comments and SuggestionsDid we leave something out? We welcome your comments and suggestions!
Send your comments to us. We'd love to help, and enjoy a good challenge.
sales@letterbank.com or fax to 888-477-1176 (fax number only).
Get help at MyDIYsigns.com by clicking the "message: panel at the bottom or "Contact" at the top.
Comments
Post a Comment